A steak craving usually shows up at the wrong time. You want something hot, browned, and satisfying, but pulling out a grill pan, heating the full oven, or stepping outside for the grill feels excessive when you're cooking one piece of meat.
That's where the toaster oven earns its place. A good one can cook a steak well, not as a backup plan, but as a smart tool for a weeknight dinner, a small kitchen, or a quick solo meal. The trick is knowing that time alone won't save you. In a toaster oven, heat can be uneven, broilers vary, and one steak can cook very differently from the next.
A lot of steak in toaster oven advice stops at “broil a few minutes per side.” That's enough to get people in trouble. What works better is a simple decision framework: choose the right method for your cut, use the appliance you own, and let internal temperature tell you when the steak is done.
The Secret to Perfect Steak Is on Your Countertop
It's 6:30, you want steak, and turning on the full oven for one piece of meat feels wasteful. A toaster oven handles that job well, especially when the goal is a properly cooked steak without heating the whole kitchen.
What surprises people is not that a countertop oven can cook steak. It's that it can cook it with real precision. The smaller cavity heats quickly, keeps the steak close to the heating element, and makes it easier to manage a single portion than a big oven does.

Why the toaster oven works
Published guidance from appliance makers like KitchenAid often points cooks toward a hot preheat, a steak around 1 inch thick, and a broad cooking window with a full rest afterward. The wide range matters. In practice, that spread exists because toaster ovens vary a lot. Some broilers are aggressive, some convection fans dry the surface faster, and some units run cooler than the dial suggests.
That's why I don't treat toaster oven steak as a minutes-per-side recipe. I treat it as a temperature job. Use high heat to build browning, then let internal temperature decide when the steak comes out. That approach works whether your oven runs hot, cooks unevenly, or needs a little more time than the manual suggests.
A thermometer does more for steak quality than any preset button.
What the countertop setup does well
A toaster oven is especially strong for one or two steaks because it cuts down on dead space. You preheat faster, recover heat quickly after opening the door, and keep cleanup simple with a rack and tray setup.
It also gives you options. A lean sirloin can benefit from a gentler roast-then-broil approach. A strip steak or ribeye can handle more direct top heat. If you usually buy tender cuts and want a nutrition-focused breakdown, this filet mignon protein guide is a useful reference. If your dinner planning leans high-protein, this article on boost metabolism with low sugar protein is a practical companion.
Where cooks miss the mark
The biggest mistake is trusting the clock more than the meat. In a toaster oven, five minutes can mean “still cool in the center” in one model and “past medium” in another. Thickness, starting temperature, rack position, and broiler strength all change the result.
The second mistake is expecting the appliance to fix weak technique. If the steak goes in cold, wet, crowded, or on the wrong rack, the oven cannot rescue it. Good toaster oven steak comes from matching the method to the cut, using high enough heat, and pulling the steak by temperature instead of guesswork.
That's the primary advantage of the countertop oven. It gives you a fast, controlled way to cook steak, as long as you cook by doneness, not by hope.
Choose Your Cut and Prep for Success
A toaster oven can cook steak well, but it rewards good prep and exposes bad prep immediately. If the steak goes in wet, under-seasoned, or oddly shaped, the oven won't hide it.
Pick a steak that fits the method
Steaks with a fairly even shape are easiest to manage in a toaster oven. You want something that sits flat on the rack and cooks predictably from edge to center. Ribeye, strip steak, and sirloin all work well when they aren't so large that they crowd the tray.
If you're already thinking in nutrition terms, it also helps to understand how different cuts fit into a high-protein meal plan. This guide on boost metabolism with low sugar protein is useful background if you're building dinners around protein without piling on sugary sauces or sides.
Filet lovers usually want precision above all else, and that's where temperature-based cooking shines. For a quick nutrition angle on that cut, this filet mignon protein guide is a handy companion read.
The prep steps that matter
Before the steak goes anywhere near the oven, do these things:
- Dry the surface well. Pat the steak thoroughly with paper towels. Moisture on the exterior turns into steam, and steam is the enemy of browning.
- Season with confidence. Salt and black pepper are enough for a strong first pass. In a toaster oven, simple seasoning lets the beef flavor stay clear.
- Use a rack if you have one. Elevating the steak helps hot air move around it and keeps the underside from sitting in rendered fat.
- Line the tray with foil. Cleanup gets easier, and you're more likely to cook steak this way again if the aftermath isn't annoying.
A steak that starts dry and exposed to moving heat browns better than one sitting damp on a flat pan.
What doesn't work well
Very thin steaks are hard to control because they move from underdone to overdone quickly. Highly irregular cuts can also be frustrating in a toaster oven because the narrow end finishes before the thicker section catches up.
Heavy marinades are another weak spot. They can taste good, but sugary or wet coatings often burn before the steak cooks the way you want. For this method, dry seasoning or a light oiling works better than a sticky marinade.
Good steak in toaster oven cooking starts before preheat. If the surface is dry, the cut is manageable, and the steak fits the tray without crowding, you've already removed most of the reasons this method fails.
Three Proven Methods for Toaster Oven Steak
Not every steak needs the same approach. The right method depends on the cut, the thickness, and the kind of toaster oven sitting on your counter.
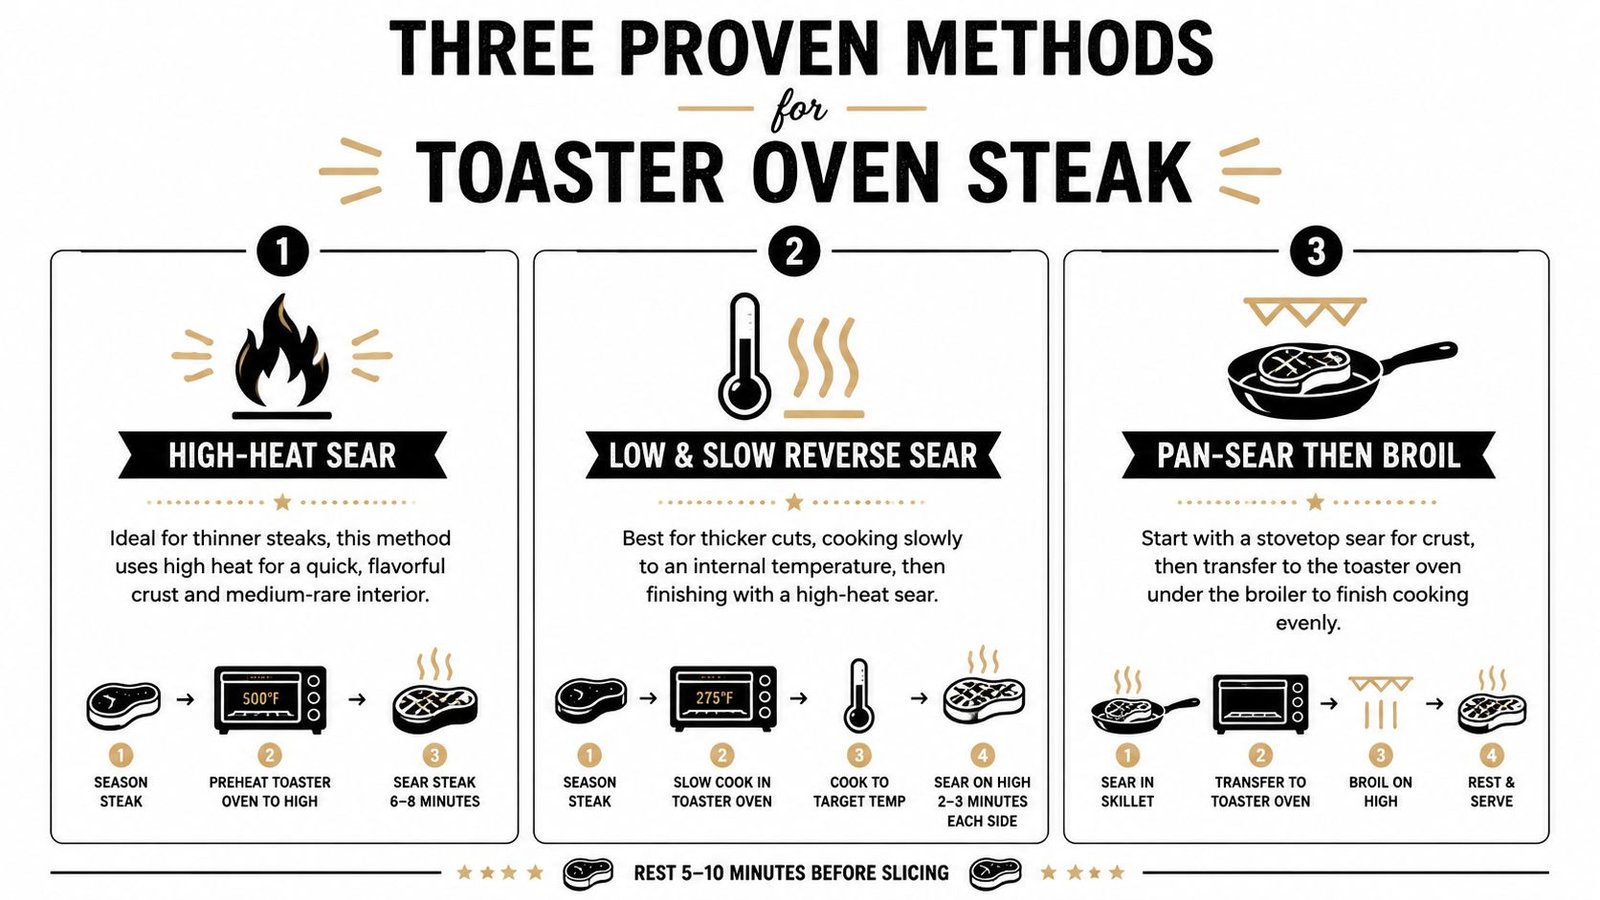
Method one with classic broil
This is the fast, direct route. If your toaster oven has a strong top broiler and your steak isn't especially thick, broiling is the closest thing to restaurant-style top heat.
A practical baseline for broiling steak in a toaster oven is 5 to 7 minutes per side, using a foil-lined tray and broiler rack, but that's only a starting point. The more reliable finish line is the USDA recommendation of 145°F for beef, followed by a 3-minute rest (Lose It broiled toaster oven steak guide).
Best for
- Thinner steaks
- Cooks who want speed
- Ovens with an aggressive broiler element
Trade-offs
- Great top crust
- Higher risk of overcooking if you rely on time only
- More sensitive to hot spots
Method two with gentle roast
Some toaster ovens broil unevenly. If yours scorches one corner and leaves the other pale, the bake setting may give you better control. This method uses more even ambient heat, so the steak cooks more gradually.
I like this approach for thicker cuts or for anyone who has already ruined one steak by chasing color too early. You won't get the same immediate char as broiling, but you gain a steadier climb toward your target temperature.
Here's the practical upside. A gently roasted steak gives you more room to react. If you check early and it needs more time, you still have options. If you overshoot under a hard broiler, you don't.
Method three with reverse sear
This is the most controlled way to cook steak in toaster oven form. Start with lower, gentler heat until the interior is nearly where you want it, then finish with a short blast under the broiler.
The center stays more even, and the outer gray band stays smaller. For thicker steaks, this is the method that feels least like gambling.
If your priority is even doneness over speed, reverse sear is the smartest play.
A simple comparison helps:
| Method | Strength | Weak spot | Best use |
|---|---|---|---|
| Classic broil | Fast crust | Easy to overshoot | Thinner steaks |
| Gentle roast | Even cooking | Less dramatic browning | Hot-spot ovens |
| Reverse sear | Maximum control | Takes more attention | Thicker steaks |
How to choose the right one
Use classic broil if the steak is modest in thickness and you trust your broiler. Use gentle roast if your toaster oven runs unevenly or if you're nervous about scorching. Use reverse sear when the steak is thick enough that you care more about edge-to-edge doneness than shaving off a few minutes.
The wrong move is asking one method to do every job. A steak in toaster oven recipe becomes much easier when you match the cooking style to the equipment instead of forcing every steak through the same script.
Mastering Time and Temperature
Time is helpful, but it's not truth. In toaster ovens, it's an estimate at best.
One demo shows a T-bone cooking in 5 minutes per side, while another shows thinner top-blade steaks taking about 10 minutes total at 450°F. That spread tells you exactly why fixed timing breaks down. Cut, thickness, and oven behavior change the result, so the only dependable way to cook steak in toaster oven style is to watch internal temperature and use the USDA safe minimum of 145°F for beef as your safety floor (YouTube demonstration reference).
Your thermometer is the decision-maker
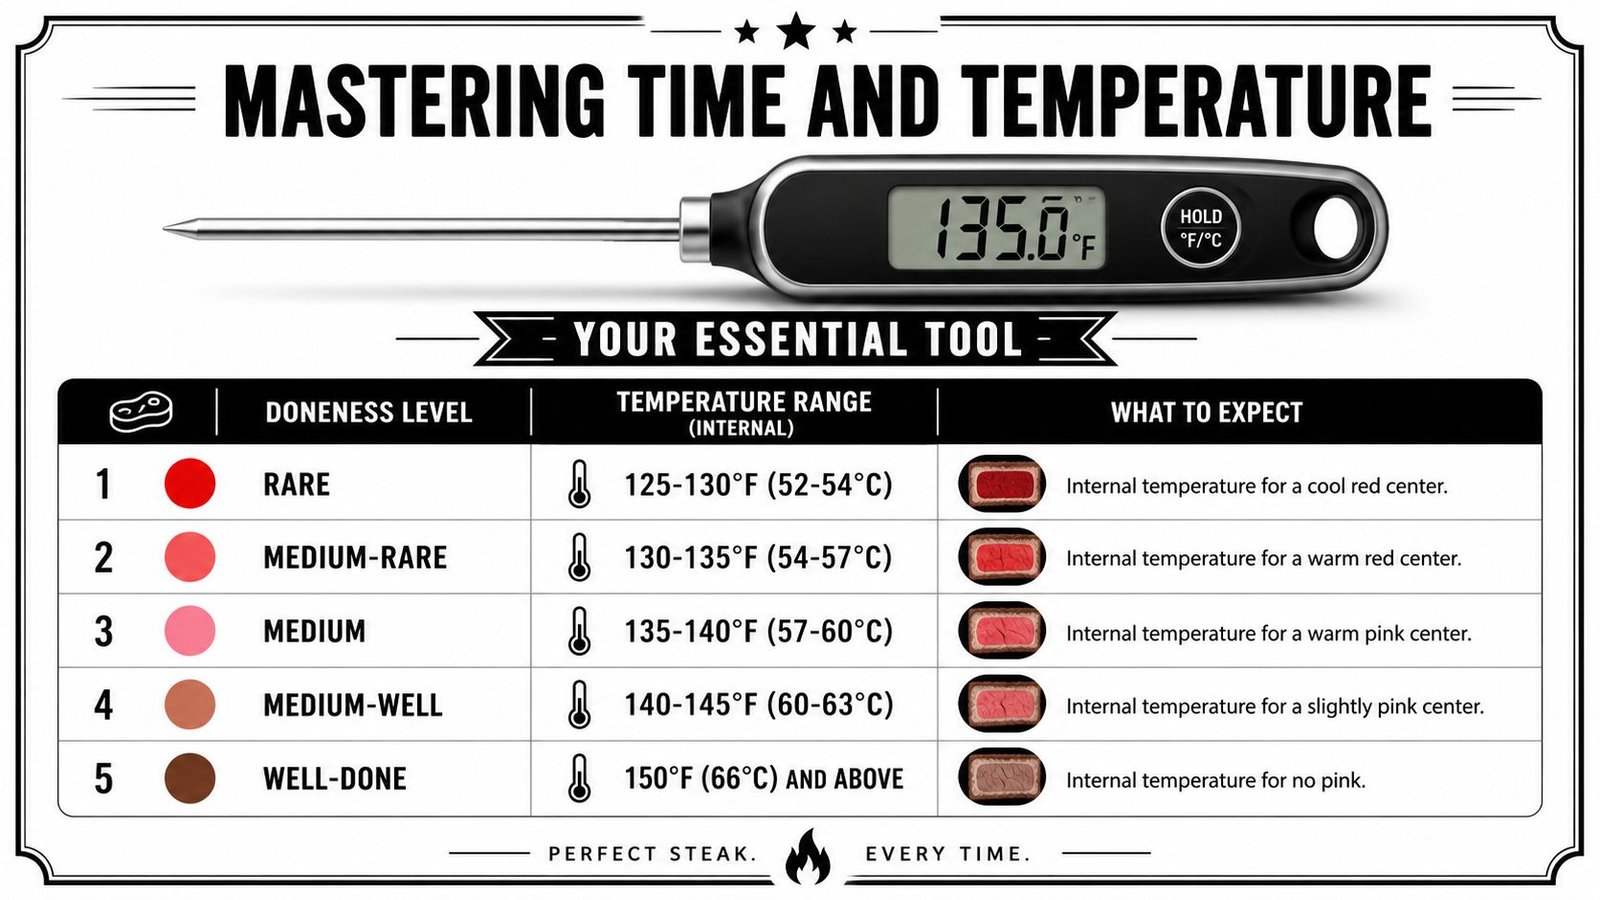
Use an instant-read thermometer and check the center of the steak from the side if possible. Don't guess by color on top. Don't trust firmness if you're new to the method. The inside tells the truth.
The visual below is a useful doneness reference:
The infographic lists common doneness targets, but for safe, predictable cooking in a home kitchen, treat 145°F as the key benchmark to understand and verify with your thermometer.
A practical framework instead of a fixed recipe
Use this decision guide while cooking:
- If the outside is browning too fast: Move from broil to bake, or lower the rack position if your toaster oven allows it.
- If the center is lagging: Stay patient and keep checking temperature instead of extending by blind chunks of time.
- If the steak is coloring too slowly: Finish with a brief broil after the interior is close.
- If your oven has obvious hot spots: Rotate the tray during cooking.
The moment you start pulling steak by temperature instead of the clock, the method gets easier.
Carryover matters
A steak keeps cooking after it leaves the heat. That's why the final minutes need some judgment. Pulling it exactly when it looks perfect in the oven can leave you with a slightly overdone steak on the plate.
The smart move is to treat the toaster oven as a heat source, not a timer-driven machine. Once you do that, steak in toaster oven cooking stops feeling unpredictable and starts feeling repeatable.
Resting Carving and Finishing Your Steak
You can nail the pull temperature and still lose the result in the last few minutes. Resting, slicing, and finishing decide whether the steak stays juicy on the plate or spills its moisture onto the board.
Let it rest before you slice
Set the steak on a warm plate or cutting board and leave it alone. A thicker steak benefits from a longer rest than a thin one, but a good rule is to wait until the surface heat calms down and the juices stop pushing out the moment you cut.
In practice, I give most toaster oven steaks about 5 to 10 minutes. That short pause lets the meat settle and gives carryover heat time to finish its work. If you slice right away, the center usually looks wetter on the board and drier in the bite.
Finish with a light hand
A good finish should support the steak, not cover it up.
- Butter adds gloss and richness, especially on leaner cuts like sirloin.
- Flaky salt sharpens the crust right before serving.
- Fresh black pepper, chives, parsley, or thyme are better added after cooking if you want a clean, bright aroma.
- A quick spoon of pan juices or a simple side sauce works well if dinner needs a little more moisture.
If you're serving the steak with potatoes, rice, or vegetables, this guide on how to use bouillon cubes is useful for quick sauces, brothy vegetables, and other practical side upgrades.
If you like to keep dinner organized after cooking, this guide to food trackers for habit building covers what makes logging easier to stick with.
Slice across the grain
Check the direction of the muscle fibers first. Then cut across them into thin slices.
That matters most with firmer cuts, where slicing the wrong way makes each bite chew longer than it should. For ribeye or other tender cuts, the difference is smaller, but it still improves the texture.
These last steps are simple, but they are not throwaway details. Pull by temperature, rest with intention, and slice correctly. That is how toaster oven steak goes from decent to repeatable.
Log Your Meal in Seconds with PlateBird
A well-cooked steak is satisfying on its own, but it's even more useful when it fits cleanly into your day. If you track protein, calories, or meal consistency, steak is one of the easiest dinners to keep organized as long as logging doesn't become its own chore.
That's the problem most food trackers create. They add friction right when you're hungry. If you want a broader look at what makes a tracker easier to stick with, this guide to food trackers for habit building is a helpful starting point.
Why simple logging matters
A meal like steak, vegetables, and a starch sounds straightforward, but many apps make you search each item separately, compare duplicate database entries, and guess which one is closest. That's exactly the sort of busywork that makes people stop tracking.
PlateBird takes a more practical route. You can type your meal in plain language, or use a photo, and move on.
![]()
What that looks like with a steak dinner
A meal entry doesn't need to be complicated. You could log something like sirloin steak with butter and asparagus, and the app handles the breakdown instead of sending you through a long search flow. If you plated the meal nicely, taking a photo works just as well.
For repeat meals, the benefit gets even better. Once you've logged a few versions of your usual steak dinner, the process becomes almost automatic. That's the kind of convenience that keeps tracking realistic on busy nights.
You can explore the app directly at PlateBird.
If you want food logging to feel as easy as cooking a single steak in your toaster oven, try PlateBird. You can type your meal in plain English, snap a photo, and get calories and macros without the usual database hunt. It's a fast, low-friction way to keep a great dinner aligned with your goals.